Once the background pages are laid out, start by placing your photos and/or items on the pages and begin to get an idea of how you'd like to arrange them. I say items because I'm one who loves to save "things" from various occasions. For example, I save and scrap all the receipts from my son Christian's birthday cakes. I think someday it will be fun to look back and see what birthday cakes cost "way back when". After all, it is called scrapbooking, not photobooking. This is one area where I really enjoy getting creative with seeing what fun and different things I can come up with to scrap.
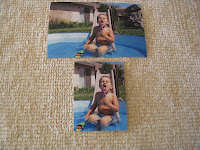
A little snag that I've run into more than once is choosing which pictures to include in the layout. Choosing the ones that best tell the story of your occasion can be challenging, but necessary. There will be times when you will feel that you want to scrap every single photo you've taken. By process of elimination, try and narrow down each occasion to 10 to 12 photos. That's just a guideline I usually follow, but again this is your layout. You get to do whatever you like. Once the pictures are chosen, the next thing to do is to trim them. You want to trim off as much as possible while still leaving the focal point of the photo. This is one helpful thing I did learn at that first scrapbook party I went to, so it wasn't a total waste of my time:o) Think of it this way. When looking at a photo, are you really looking at what is surrounding the subject? No, you're looking primarily at the subject, the whole reason you snapped the photo in the first place. Keep what you need, and get rid of what you don't. This is key when making room for all the photos you've chosen for your layout. Once you give it a try you'll see what I mean.
A little snag that I've run into more than once is choosing which pictures to include in the layout. Choosing the ones that best tell the story of your occasion can be challenging, but necessary. There will be times when you will feel that you want to scrap every single photo you've taken. By process of elimination, try and narrow down each occasion to 10 to 12 photos. That's just a guideline I usually follow, but again this is your layout. You get to do whatever you like. Once the pictures are chosen, the next thing to do is to trim them. You want to trim off as much as possible while still leaving the focal point of the photo. This is one helpful thing I did learn at that first scrapbook party I went to, so it wasn't a total waste of my time:o) Think of it this way. When looking at a photo, are you really looking at what is surrounding the subject? No, you're looking primarily at the subject, the whole reason you snapped the photo in the first place. Keep what you need, and get rid of what you don't. This is key when making room for all the photos you've chosen for your layout. Once you give it a try you'll see what I mean.
Here is a before and after look of a trimmed photo.


0 comments:
Post a Comment